

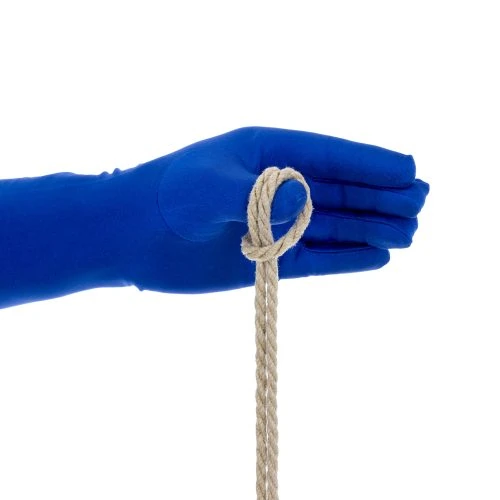
Esse popular empate de coluna única com tensão reversa é atraente, fica relativamente plano e é muito seguro.
As gravatas Single Column criam um punho, um cinto, uma tira ou uma faixa que não se desprende em torno de qualquer um coisa.
- Pulso
- Tornozelo
- Coxas
- Joelho
- Cintura
- Tórax
Esse é o ponto de partida para muitos laços, como o Unchastity Belt (Crotch Rope) e o Amarração de calcanhar com estribo. (Aqui no TheDuchy, às vezes abreviamos "Lark's Head Single Column" para "LHCS").
As colunas simples de tensão reversa são mais lentas do que os estilos de tensão direta, como o Somerville Bowline pois exigem que a cauda seja puxada (todo o comprimento da corda deve ser puxado por alguma parte do nó durante a amarração, nesse caso, 2 a 3 vezes). Ela não pode ser desamarrada sem liberar a cauda (isso pode ser bom ou ruim, dependendo da situação).
Dica de segurança importante! Os pulsos são sensíveis e devem ser manuseados com cuidado.
- Eles têm muitos nervos e vasos sanguíneos próximos à pele na parte interna dos pulsos. O excesso de pressão nesse local pode afetar o fluxo sanguíneo ou a condução nervosa. Os punhos nunca devem ser muito apertados; você sempre deve poder passar dois dedos por baixo do punho.
- A própria articulação do pulso também é frágil. Se você puxar os pulsos com muita força, poderá danificar essa articulação ou até mesmo empurrar alguns dos pequenos ossos do pulso para a posição errada. NUNCA suspenda alguém somente pelos pulsos. Nunca amarre alguém em uma posição em que a corda esteja aplicando uma tensão pesada e contínua sobre os pulsos.
- Um exemplo disso seria se você amarrasse os pulsos de sua parceira nos postes da cama, depois agarrasse os pés dela e os puxasse bruscamente em direção aos pés da cama. Nesse caso, você pode acabar aplicando muita pressão nas articulações dos pulsos. Amarrar sua parceira na cama pode ser muito divertido, mas certifique-se de que haja folga suficiente na amarração para que ela possa mover os braços e os pulsos o suficiente para ajustar a disposição da algema e dos fios da corda de tempos em tempos.

Para este tutorial, usei um pedaço de 10′ (~3m) de Cânhamo natural de 1/4″ (6mm).
Para a maioria dos vínculos neste site, eu uso um incrível Cânhamo natural corda fornecida por minha afiliada Monge Torcido. Dê uma olhada neles!

Conteúdo do vídeo:
- Criando o manguito (0:44)
- Travando a braçadeira, estilo de tensão para frente (4:04)
- Travando a braçadeira, estilo de tensão reversa (6:16)
Hi, its very clear. Apart aesthetism, does this single colum often use compare to the somervile one ?
Thank you
This question is answered in the tutorial above, in the paragraph that begins “Reverse-tension Single Columns are slower…” If you have further questions beyond that, let me know!
The triangle is such a clean look! I finally got this one after a handful of tries, and it’s kind of great. Thanks!
Hello I have a question about locking bandswrapscuffs off. I notice in the older version here that you lock off by pulling the tail UNDER the cuff then leading it back over the cuff and through the loop. This seems to be the same general idea as in your Locking off a Strap video on the Half-Hitch tutorial page both for the reverse and forward tension examples as well as in the Bondage Belt w Happy Strap and Unchastity Belt tutorials. In the newer version here though for both the forward and reverse tension versions you start by bringing the tail OVER the cuff then leading it back under the cuff and through the loop. The Prusik Single Column tutorial seems to have this same general idea too. What Im wondering is if there is a significant difference between the under cuff first and over cuff first approaches to locking off. I want to make sure Im not missing something important especially if there are safety considerations
Assuming you make sure that all the strands in the cuff have the same tension and are not too tight, there is no real safety difference*, these are all just half hitches locking off the strap.
* One could argue that reversing tension one last time before locking off with a half hitch has a marginal safety edge in that it adds more friction, but it also adds significantly more bulk, which represents a risk too if it tension is added to the tail in such a way that the bulky knot is pressed into the skin in a sensitive area. So I prefer the less bulky version for tails running parallel to the column and I use the Somerville Bowline when the tail is going to run perpendicular to the column.
As a more experienced person and me just learning how would you determine which knot to use. What would determine that I want to use the forward over the reverse. I just needed so clarification.
I need to put together a post on this! Generally, Reverse SCs are good for greater security. They cannot be untied without releasing the tail. They also have a certain look that some prefer. Forward SC, can be tied or untied without releasing the tail. This can be a great safety feature. When “slipped” (as in a Slipped Somerville Bowline), it can allow for a quick release. Check out the Malasana tie for an example.
Is there a way to add additional wraps to this?
Yes. Most riggers tend to stop at 2 wraps (4 cords) or 3 wrap (6 cords) because beyond that the cords tend to start bunching up when you lock them off with the half hitch. That said, I have seen people do many wraps and just account for the bunching by adding a little more slack.
Followup question!
If I were to try a third wrap, would I have to pass the tail through the beginning of the wrapping (so only under two ropes, the ones close to the lark’s head), or should I pass it under both of the other wraps (so under 4 ropes)?
Man, this is complicated to put into words… I’m not sure I explained myself.
I’m still going to try this on myself, but I wanted to get an expert opinion first.
No worries. In Step 5 (after reversing tension), wrap twice instead of once as shown. Then continue on with the rest of steps at shown. In Steps 9-10, go under all 6 strands instead of the shown 4.
I am planning an update of this tutorial sometime in the next few months. I will add this variant to the new version!
Hello! I am new to all this, but just wanted to say I find your site awesome and really helpfull, cheers! 🙂
Hello! I was curious about a part of this tie, after step 8. I notice that the tension is not reversed before locking off the tie with a half hitch. I was previously taught to always reverse the tension before locking it off, so I was curious about the potential advantage/disadvantage of doing so.
Good Question! Both work fine. The advantage of doing it this way is mostly aesthetic (I think it looks nicer) but it is also a bit less bulky. The advantage of adding the reverse before doing you half-hitch is that it is a little easier to set and maintain your tension while locking off the cuff. I personally find that the difference is minimal though. But you raise a good point! I will update the tutorial itself with this comment.
[...] uma gravata de coluna única (um tutorial fotográfico passo a passo) [...]
[...] Este é um nó adequado!... [...]
This is a proper knot!