")
This tutorial covers various ways to attach suspension uplines. Smoothly connect to a single point, 2 points (a Y Hanger or Epsilon), or 3 points (a W Hanger).
To do a suspension, you need to add a suspension-worthy harness (or two) to your partner, attach a rope to that harness (this tutorial), connect that rope to a trustworthy hard point (usually setting up a lift system to do so), do the lift, then lock off the line.
So…
How do you attach an upline?
There are many ways! Let’s look at a few of the more common:
视频内容:
- When you already have an integrated upline… (0:25)
- 1-Point Hanger: Rope-only version, Classic Technique, featuring the Square Knot Single Column (1:22)
- 1-Point Hanger: Rope-only version, Core Technique, featuring the Somerville Bowline (2:54)
- Choose what you will do with the bight:
- Leave it free (3:30)
- Use up the extra, then lock it off (3:56)
- Use it as a Single Lift Loop (4:16)
- Why a Single Lift Loop should only be used for secondary uplines (4:47)
- Convert it to a Double Lift Loop / Double Bight (5:26)
- 1-Point Hanger: Rope-only version, Faster Technique, Somerville Bowline (6:47)
- Choosing a carabiner. Less traditional but reduces friction damage to your rope. (8:40)
- 1-Point Hanger: Carabiner version, Hanger Connection (9:33)
- 1-Point Hanger: Carabiner version, Direct Connection (12:30)
- Multi-Point Hangers: Why they are useful. (14:27)
- 2-Point Hanger: Rope-only version, featuring the Somerville Bowline (15:05)
- 2-Point Hanger Feature: Changing the angle of the upline (17:04)
- 2-Point Hanger: Carabiner version (18:02)
- 3-Point Hanger / “W” Hanger: Rope-only version (21:04)
- 3-Point Hanger: Carabiner version (23:39)
- 4-Point Hanger: Rope-only version (24:42)
- 4-Point Hanger: Carabiner version (26:33)
Core upline attachment concepts & 1-Point Hangers (“Adding an upline”)
There are a number of methods to add an upline! Learn these first.
This section covers concepts that will be used but not repeated in the multi-point sections 下面。
Before we talk about techniques for primary/main load-bearing uplines (supporting the chest or hips), let’s talk about suspending other lighter or secondary elements like knees, ankles, arms, wrists, heads, etc.
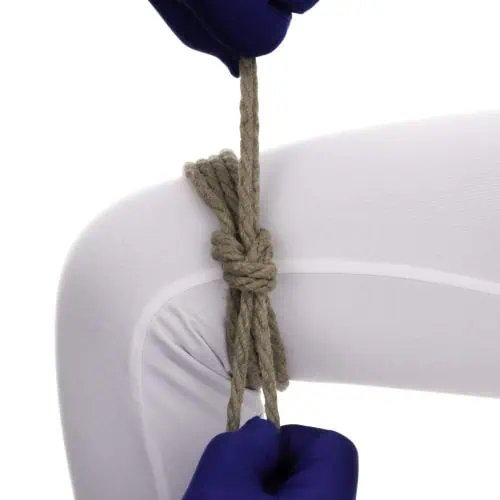
As we go through this tutorial, we will usually have some bight free after the tie is complete. Here are several options for using it:
Lock off the bight
重要的是: If you are using a knot that can potentially collapse, like the classic approach of using a Square Knot Single Column, it is crucial that you lock off the bight by running the tail through it as shown here, to limit how far the knot can collapse.
But even if you are using a non-collapsing approach like the Somerville Bowline where, it can still be helpful to lock off the bight to get it out of the way.
Leave the bight free
IF it is a non-collapsing node like the Somerville Bowline or if you plan to use it directly as a Single Strand Lift Loop
IMPORTANT: Do not use a Single Strand Lift Loop for heavy loads like chest or hips. This is only suitable for lighter loads like partial suspensions or secondary elements like knees, ankles, arms, wrists, heads, etc.
Convert the bight to a Double Bight/Double Lift Loop
This technique allows you to use a lift loop with lower risk. There are two reasons for this:
- The lift line will be going under two strands instead of one, which decreases the curve of the rope passing through the Double Bight, reducing the stress on the rope during the lift.
- The Double Bight will be in a slightly different place each time instead of always at the exact center of the rope as with the Primary Bight. Therefore, the friction damage caused by the lift will be distributed to various places, increasing the useful life of your rope.
This approach is useful for a more traditional look or if there is some issue with running the lift line directly under the strap (perhaps it is awkwardly placed or would tend to move the rope in an undesired way).
Let’s look at that from another angle
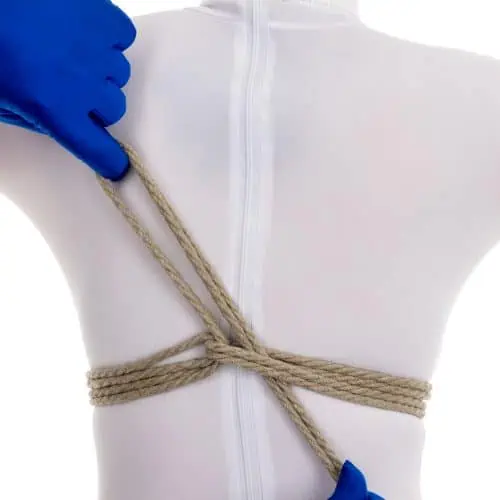
1-Point Hanger – Approach 1 (Rope Only) – Do a Single Column around the lines of the strap (Classic)
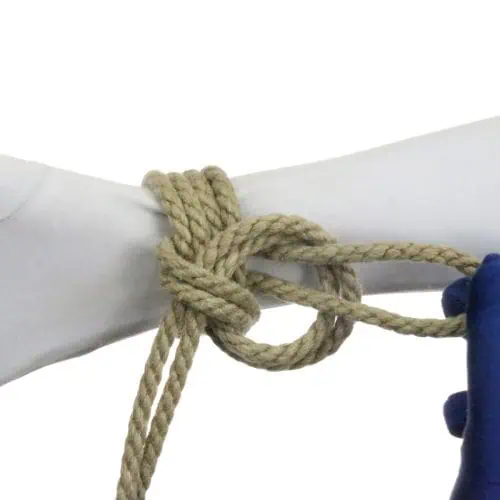
The Somerville Bowline method (Lower risk)
所谓的 萨默维尔布林结 is a great choice for creating a rope-only lock off. It is easy to tie correctly and is quite fast. Even if the knot is not perfectly formed, it is quite forgiving and will quickly settle into a stable, non-collapsing state as soon as tension is applied. It is therefore a lower-risk choice, particularly good as you are learning. This is the approach I use when going with a rope-only tie.
The Single Column method (More traditional)
This is the more traditional/classic approach, using a 平结单柱缚, sometimes also just called a ‘Single Column’. This approach is slightly higher risk. This kind of Single Column can collapse under tension. To reduce this risk, riggers add another Overhand Knot, sometimes two, on top of the first Square Knot that is an integral part of the Single Column. I show this below. Doing this helps protect the first Square Knot. If tension deforms the top part of the knot, that deformation usually cannot travel all the way to the cuff to turn it into a collapsing loop. Usually. There is still a chance. Particularly if using rope with lower tooth (more slippery rope) or if the knots are ill-formed or are not tightened sufficiently, as is more common with less-experienced riggers. For that reason, many people have switched to using the Somerville Bowline as the lock off, as is shown above. The Somerville Bowline is much easier to tie correctly and therefore the lower-risk choice as you are learning.
Let’s look at that from another angle
Using a carabiner instead of only rope will reduce the friction damage to your rope. It is less traditional, but more and more riggers are using them.
NEVER USE AN UNRATED CARABINER. These are intended to carry light to medium loads for camping or other utility applications. They are NOT designed to safely hold the weight of a human. Use only carabiners designed for climbing.

Use only carabiners designed for climbing.

They will have symbols on the side that looks something like this.
If a carabiner does not have rating information like this, do not use it for suspension.
, so 24 kN means 24 people that each weigh ~ 224 lbs/100 kg)")
This means that this carabiner is rated to support:
① 24 kN if loaded the long way with the gate closed
② 8 kN if loaded the short way
③ 8 kN if loaded the long way with the gate *open*
1 kN is approximately 224 lbs/100 kg on planet earth (with our force of gravity). So “24 kN” means 24 people that each weigh ~ 224 lbs/100 kg.
There are several approaches.
In-line Half Hitch Lock Off
In this approach, the upline does not run through the carabiner before heading to the overhead hard point for the first time.
Upline through the carabiner
In these approaches, the upline run through the carabiner first before heading to the overhead hard point for the first time.
Lock off 1 – The Half Hitch method
Lock off 2 – The Overhand Knot method
This version requires a tail pull and so takes a little longer than the Half Hitch method, but the tail naturally flows upwards, so it has an aesthetic appeal.
Rapid untie when using a carabiner
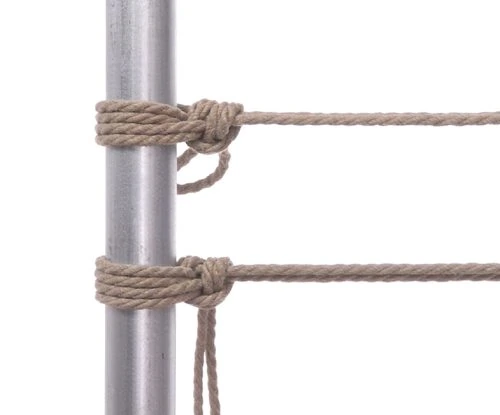
Multi-point hangers.
There are many common situations where you want to connect a rope to a harness, but you need to support more than one line.
(This section relies on concepts discussed in the 1-Point Hanger section above. The common options for locking off the hanger are the same: Traditional Square Knot, Somerville Bowline or Carabiner. The only real difference is how you run the rope 之前 doing the lock off.)
2-Point techniques can be used to
- Attach to two 不同的 straps.
- Attach to two different points 在 same strap.
Note: I run the rope the direction I do to be consistent with how I teach the Somerville Bowline Single Column. It’s perfectly fine to run the rope in the other direction.
See “Tips or using a 2-Point hanger in a lift system” below for important usage information.
见 Other Angles section below to see this applied in different ways.
Attaching to two different points on the same strap
Just as with the 1-Point Hangers, you can also use a carabiner:
Paths for running the rope
Keep the length of the legs equal … unless your suspension will be at an angle
This is just an extension of the ideas shown in the 2-Point Hanger section above.
Locking off with a Somerville Bowline
Locking off with a carabiner
While you 可以 extend the ideas shown in the 3-Point Hanger section above, if you find yourself in this situation, consider using two separate up lines with 2-Point Hangers. There could conceiveably be times when a 4-Point might helpful, but they woudl be rare.
That said, here is an example of how you could do it:
Locking off with a Somerville Bowline
Locking off with a carabiner
This is just an extension of the ideas shown in the 2-Point Hanger section above.