
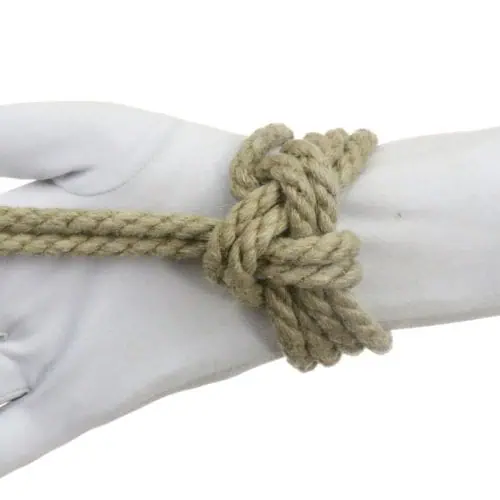
这款迷人的座袋简单、系带快捷,可用于悬吊,但仅限于织带朝下的侧悬吊,而且仅限于胸部与臀部持平或高于臀部的位置,如水平侧悬吊;不要将其用于倒立。 它可以让你有一个单一的连接点,将压力转移到对侧髋关节,很好地将你的同伴支撑在其身体非常强壮的部位上。 通过练习,2 分钟左右就能完成这个动作。
这是具有类似功能的相关编织臀部安全带系列的一部分:
这种款式系起来最快,但编织时的摩擦力也最小。根据不同的因素,有些人发现这种款式更容易勒紧大腿内侧。 如果是这种情况,请尝试 Rosette 版本,看看是否更适合您。
将其与支撑型胸背带(如 珍珠绳束, 绳索仙女的爱抚 或 渔夫背带 (还有很多其他不错的选择),让你的伴侣可以侧躺在绳子上。 还可以考虑为他们的腿部增加支撑,也许只需要一个简单的 萨默维尔布林结 或其他 单柱 膝关节或膝关节和踝关节上方,或更详细的如 悬吊单腿曲膝缚.
重要信息:请勿使用此 如果您打算将您的伴侣倒置到任何程度,使其头部低于臀部,则需要使用该安全带。 如果力量朝头部向上倾斜,或者在向上倾斜和向两侧伸直之间的任何角度,这种座袋都能提供很好的支撑。 但需要注意的是,该款安全带并不能很好地防止下滑。 因此,如果力量完全指向下方,安全带就有可能从臀部滑落。 如果您打算让您的伴侣倾斜到水平线以外的位置,请选择另一种安全带,一种可以牢固固定在腰部的安全带,也许是 鼓线束 或 Leto Harness(教程即将出版)。

在这个教程中,我使用了一块30英尺(约9米)的 天然1/4英寸(6毫米)的麻线. 延长绳索 如果您需要更多; 用完 如果您拥有太多。
我使用的是由我的附属机构天然麻绳提供的惊人的Twisted Monk。 看看他们吧!

视频内容:
- 核心技术 (0:21)
- 水平侧悬挂连接点演示 (6:31)
左侧显示: 我将这样系,使编织在我搭档的左侧。 这样系的话,如果在侧悬挂中使用这条领带,就会是左侧朝下。
在右侧执行此操作: 在下面的说明中,我指导您使用右手或左手。 这样做可以提高您的速度和效率。 如果您想在右边打结,只需将下面的内容反过来即可。 (也就是说:当我说 "右手 "时,用左手,等等)。
绳索长度: 我用了一根 30 英尺(9 米)长的绳子。 对于这个特定体型的人来说,这根绳子足够我总共缠绕三圈。 如果我绑的是一个不同体型的人,或者我需要绑 4 圈等,我就需要不同数量的绳子。 请记住,您可以 延长你的绳索如果您需要更多,请联系我们。
Hi there!
Me (a 175 cm tall & 90 kg girl with a chubby build) and my partner (a 2 m tall & 100 kg athletic guy) tied this on each other and we’re running into the harness tightening itself around the thigh in a way that would end up being unsafe. We tried it over both clothing & bare skin, with 3 wraps & with 4 and the same issue arises – when weight is put into the harness the way it’s shown on pic 39, the part around the thigh starts tightening itself and it doesn’ really stop.
Is there any way to prevent this?
There are a number of reasons this might be, but my first suspect would be friction. If the rope itself has less friction between the strands, it can more easily slide in a configuration like this. So if, for example, you are using a synthetic fiber like nylon or mfp and you are feeling this effect, you may have a different result if you switch to a natural fiber like hemp which usually has greater ‘tooth’, i.e. more friction.
If you are already using a rope like that, you can add friction during the tying process by making sure there is enough tension in the ropes that the press into the skin for about 1/3 to 1/2 their diameter, and that you maintain that level of tension throughout the tie so that the weave is consistent and you can see the rope deflect around the other ropes as they go through the weave.
But before you spend time fiddling with that, I would suggest you try a different, related tie: https://www.theduchy.com/woven-hip-harness-one-sided-rosette/
This version does the lock off on the weave itself, automatically adding more friction. Try that version and see how it feels on you. Perhaps it is better suited to your needs.
Could you elaborate a little on the reasons behind avoiding inversion with this tie? Could you suggest a safe window in which your partner can be angled?
Certainly! I have updated it with the following: Do not use this if you intend to invert your partner to any degree where their head is lower than their hips. This harness provides great support if the force is angled upward toward the head and at any degree between that and straight out to the side. But note that this version does not have much keeping if from sliding down. Therefore, if the force is pointing downward at all, you run the risk of the harness sliding down over the hip. If you plan to have your partner tipped to any further than horizontal, choose a different harness, one that anchors solidly to the waist, perhaps the Drum Harness or Leto Harness (tutorial forthcoming).
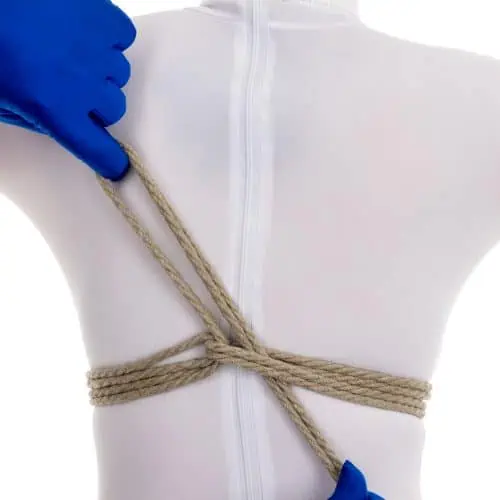
Looking forward to trying this in a suspension. Tip: I had a lot of rope to burn. Too much to just wrap around the waste band, but not enough to go around both the waste and leg again. So I went just around the waste again, weaving it down and right back up and across the back.