

这种流行的反向拉伸单柱领带很有吸引力,相对平整,而且非常安全。
单立柱领带可以在任何地方创建一个不塌陷的袖口、皮带、带子或带子。 一个 事。
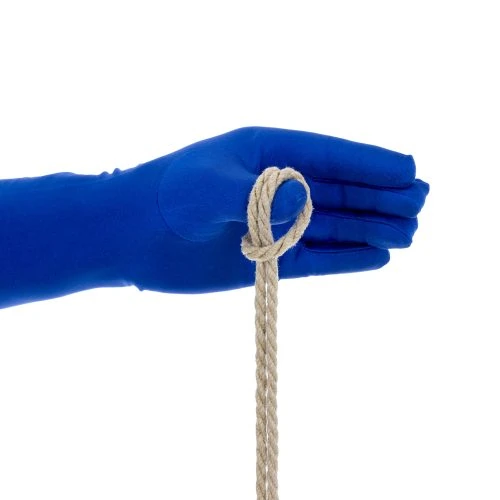
- 腕部
- 踝关节
- 大腿
- 膝关节
- 腰部
- 胸部
这是许多纽带的出发点,如 非贞操带 (胯下之绳)和 镫式高跟绑缚. (在TheDuchy网站上,我们有时将 "Lark's Head Single Column "简写为 "LHCS")。)
反向拉伸的单立柱比正向拉伸的样式要慢,如 萨默维尔布林结 因为它们需要拉动尾巴(在打结时,整个绳子的长度必须拉过结的某些部分,在这种情况下,要拉2-3次)就是说,这种领带也不那么笨重,有些人认为它更有吸引力。 它不能在不释放尾巴的情况下解开(这可能是一件好事,也可能是一件坏事,取决于情况)。
重要的安全提示! 手腕很敏感,必须小心处理。
- 他们在手腕内侧的皮肤附近有很多神经和血管。 那里压力太大,会影响血流或神经传导。 袖口不应该太紧;你应该总是能够从袖口下伸出两个手指。
- 腕关节本身也是脆弱的。 如果你太过用力拉扯手腕,就会损坏该关节,甚至将一些小的腕部骨骼推到错误的位置。 绝不要单独用手腕吊起某人。 切勿将人捆绑在绳子持续对手腕施加重压的位置。
- 这方面的一个例子是,如果你把你伴侣的手腕绑在床柱上,然后抓住他们的脚,把他们急速地拉向床脚。 在这种情况下,你可能最终对手腕关节施加过多的压力。 把你的伴侣绑在床上可以有惊人的乐趣,但要确保领带有足够的松弛度,使他们可以移动手臂和手腕,以便不时调整袖口和绳股的铺设。

在这个教程中,我使用了一块10英尺(约3米)的天然1/4英寸(6毫米)大麻。
对于这个网站上的大多数纽带,我使用了一个惊人的 天然大麻 绳索由我的分支机构提供 Twisted Monk. 看看他们吧!

Hi, its very clear. Apart aesthetism, does this single colum often use compare to the somervile one ?
Thank you
This question is answered in the tutorial above, in the paragraph that begins “Reverse-tension Single Columns are slower…” If you have further questions beyond that, let me know!
The triangle is such a clean look! I finally got this one after a handful of tries, and it’s kind of great. Thanks!
Hello I have a question about locking bandswrapscuffs off. I notice in the older version here that you lock off by pulling the tail UNDER the cuff then leading it back over the cuff and through the loop. This seems to be the same general idea as in your Locking off a Strap video on the Half-Hitch tutorial page both for the reverse and forward tension examples as well as in the Bondage Belt w Happy Strap and Unchastity Belt tutorials. In the newer version here though for both the forward and reverse tension versions you start by bringing the tail OVER the cuff then leading it back under the cuff and through the loop. The Prusik Single Column tutorial seems to have this same general idea too. What Im wondering is if there is a significant difference between the under cuff first and over cuff first approaches to locking off. I want to make sure Im not missing something important especially if there are safety considerations
Assuming you make sure that all the strands in the cuff have the same tension and are not too tight, there is no real safety difference*, these are all just half hitches locking off the strap.
* One could argue that reversing tension one last time before locking off with a half hitch has a marginal safety edge in that it adds more friction, but it also adds significantly more bulk, which represents a risk too if it tension is added to the tail in such a way that the bulky knot is pressed into the skin in a sensitive area. So I prefer the less bulky version for tails running parallel to the column and I use the Somerville Bowline when the tail is going to run perpendicular to the column.
As a more experienced person and me just learning how would you determine which knot to use. What would determine that I want to use the forward over the reverse. I just needed so clarification.
I need to put together a post on this! Generally, Reverse SCs are good for greater security. They cannot be untied without releasing the tail. They also have a certain look that some prefer. Forward SC, can be tied or untied without releasing the tail. This can be a great safety feature. When “slipped” (as in a Slipped Somerville Bowline), it can allow for a quick release. Check out the Malasana tie for an example.
Is there a way to add additional wraps to this?
Yes. Most riggers tend to stop at 2 wraps (4 cords) or 3 wrap (6 cords) because beyond that the cords tend to start bunching up when you lock them off with the half hitch. That said, I have seen people do many wraps and just account for the bunching by adding a little more slack.
Followup question!
If I were to try a third wrap, would I have to pass the tail through the beginning of the wrapping (so only under two ropes, the ones close to the lark’s head), or should I pass it under both of the other wraps (so under 4 ropes)?
Man, this is complicated to put into words… I’m not sure I explained myself.
I’m still going to try this on myself, but I wanted to get an expert opinion first.
No worries. In Step 5 (after reversing tension), wrap twice instead of once as shown. Then continue on with the rest of steps at shown. In Steps 9-10, go under all 6 strands instead of the shown 4.
I am planning an update of this tutorial sometime in the next few months. I will add this variant to the new version!
Hello! I am new to all this, but just wanted to say I find your site awesome and really helpfull, cheers! 🙂
Hello! I was curious about a part of this tie, after step 8. I notice that the tension is not reversed before locking off the tie with a half hitch. I was previously taught to always reverse the tension before locking it off, so I was curious about the potential advantage/disadvantage of doing so.
Good Question! Both work fine. The advantage of doing it this way is mostly aesthetic (I think it looks nicer) but it is also a bit less bulky. The advantage of adding the reverse before doing you half-hitch is that it is a little easier to set and maintain your tension while locking off the cuff. I personally find that the difference is minimal though. But you raise a good point! I will update the tutorial itself with this comment.
[...]单列领带(分步图片教程)[...]
[这是一个合适的绳结!......
This is a proper knot!