

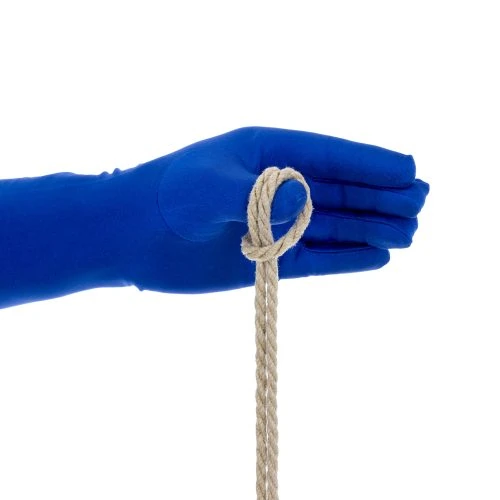
この人気の高い逆テンションのシングルコラムは、魅力的で、比較的フラットになり、非常に安全です。
シングルコラムタイは、カフ・ベルト・ストラップ・バンドなどをひとつにまとめて崩れないようにするための もの です。
- 手首
- 足首
- 太もも
- ひざ
- 腰
- 胸
これが、 貞操帯 (股縄) (クロッチ・ロープ/ 股縄)や ヒールタイ - あぶみスタイルなど、多くの縛りの出発点となります。 (TheDuchyでは、「ひばり結び(Lark's Head Single Column)」を「LHCS」と略すことがあります)。
逆テンションのシングルコラムは、ロープの引き抜きが必要なため、 丸結び(サマヴィル・ボウライン) などのフォワードテンションスタイルよりも時間がかかります(この場合は2〜3回)。 とはいえ、かさばらないため、魅力的に感じる人もいます。また、尻尾を解放しないと解くことができません(これは状況に応じて良いことも悪いこともあります)。
※重要な安全上の注意点 手首は繊細なので、取り扱いには注意が必要です。
- 手首の内側の皮膚付近には、多くの神経と血管があります。 手首に圧力がかかりすぎると、血流や神経伝導に影響を与える可能性があります。 カフスは締め付けすぎず、常に2本の指を通せるようにする必要があります。
- 手首の関節はもろいものです。手首を強く引っ張ると、関節を損傷したり、小さな手首の骨を間違った位置に押し出したりする可能性があります。 決して手首だけで吊るさないでください。 ロープが手首に強いストレスを与え続けるような姿勢で、人を縛ることは絶対にしないでください。
- 例えば、相手の手首をベッドの支柱に縛り付けた後、相手の足を掴んでベッドの足元へ急激に引っ張ったとしましょう。この場合、手首の関節に過剰な圧力がかかる可能性があります。 パートナーをベッドに縛り付けるのはとても楽しいことですが、相手が腕や手首を動かしてカフスやロープの長さを調節できるよう、十分な余裕を持たせてください。

このチュートリアルでは、約3mの 6mm原色麻縄 を使用ました。
このサイトのほとんどの縛りに、 原色麻縄 、すべてアフリエイトの Twisted Monkに提供されたものです。ぜひ Twisted Monk チェックしてみてください。

収録内容:
- カフの作成 (0:44)
- フォワード・テンション・スタイルでのカフのロック (4:04)
- リバース・テンション・スタイルでのカフのロック (6:16)
Hi, its very clear. Apart aesthetism, does this single colum often use compare to the somervile one ?
Thank you
This question is answered in the tutorial above, in the paragraph that begins “Reverse-tension Single Columns are slower…” If you have further questions beyond that, let me know!
The triangle is such a clean look! I finally got this one after a handful of tries, and it’s kind of great. Thanks!
Hello I have a question about locking bandswrapscuffs off. I notice in the older version here that you lock off by pulling the tail UNDER the cuff then leading it back over the cuff and through the loop. This seems to be the same general idea as in your Locking off a Strap video on the Half-Hitch tutorial page both for the reverse and forward tension examples as well as in the Bondage Belt w Happy Strap and Unchastity Belt tutorials. In the newer version here though for both the forward and reverse tension versions you start by bringing the tail OVER the cuff then leading it back under the cuff and through the loop. The Prusik Single Column tutorial seems to have this same general idea too. What Im wondering is if there is a significant difference between the under cuff first and over cuff first approaches to locking off. I want to make sure Im not missing something important especially if there are safety considerations
Assuming you make sure that all the strands in the cuff have the same tension and are not too tight, there is no real safety difference*, these are all just half hitches locking off the strap.
* One could argue that reversing tension one last time before locking off with a half hitch has a marginal safety edge in that it adds more friction, but it also adds significantly more bulk, which represents a risk too if it tension is added to the tail in such a way that the bulky knot is pressed into the skin in a sensitive area. So I prefer the less bulky version for tails running parallel to the column and I use the Somerville Bowline when the tail is going to run perpendicular to the column.
As a more experienced person and me just learning how would you determine which knot to use. What would determine that I want to use the forward over the reverse. I just needed so clarification.
I need to put together a post on this! Generally, Reverse SCs are good for greater security. They cannot be untied without releasing the tail. They also have a certain look that some prefer. Forward SC, can be tied or untied without releasing the tail. This can be a great safety feature. When “slipped” (as in a Slipped Somerville Bowline), it can allow for a quick release. Check out the Malasana tie for an example.
Is there a way to add additional wraps to this?
Yes. Most riggers tend to stop at 2 wraps (4 cords) or 3 wrap (6 cords) because beyond that the cords tend to start bunching up when you lock them off with the half hitch. That said, I have seen people do many wraps and just account for the bunching by adding a little more slack.
Followup question!
If I were to try a third wrap, would I have to pass the tail through the beginning of the wrapping (so only under two ropes, the ones close to the lark’s head), or should I pass it under both of the other wraps (so under 4 ropes)?
Man, this is complicated to put into words… I’m not sure I explained myself.
I’m still going to try this on myself, but I wanted to get an expert opinion first.
No worries. In Step 5 (after reversing tension), wrap twice instead of once as shown. Then continue on with the rest of steps at shown. In Steps 9-10, go under all 6 strands instead of the shown 4.
I am planning an update of this tutorial sometime in the next few months. I will add this variant to the new version!
Hello! I am new to all this, but just wanted to say I find your site awesome and really helpfull, cheers! 🙂
Hello! I was curious about a part of this tie, after step 8. I notice that the tension is not reversed before locking off the tie with a half hitch. I was previously taught to always reverse the tension before locking it off, so I was curious about the potential advantage/disadvantage of doing so.
Good Question! Both work fine. The advantage of doing it this way is mostly aesthetic (I think it looks nicer) but it is also a bit less bulky. The advantage of adding the reverse before doing you half-hitch is that it is a little easier to set and maintain your tension while locking off the cuff. I personally find that the difference is minimal though. But you raise a good point! I will update the tutorial itself with this comment.
...]シングル・コラム・タイ(ステップ・バイ・ステップの写真チュートリアル) [...] [...
...)これは正しい結び方だ!... [...] [...]
This is a proper knot!