

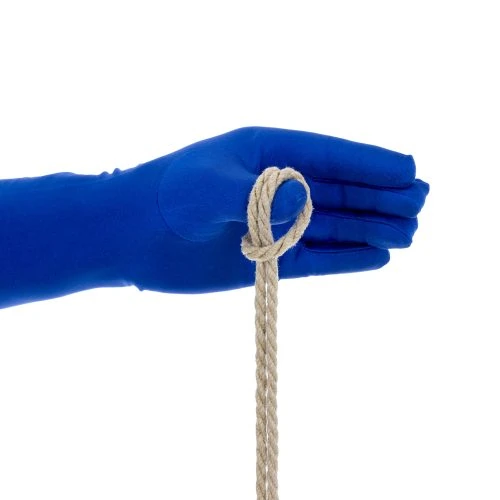
이 인기 있는 리버스 텐션 싱글 컬럼 넥타이는 매력적이고 비교적 평평하게 놓여 있으며 매우 안전합니다.
싱글 컬럼 타이를 사용하면 커프, 벨트, 스트랩 또는 밴드가 접히지 않습니다. 하나 를 입력하세요.
- 손목
- 발목
- 허벅지
- 무릎
- 허리
- 가슴
이것은 다음과 같은 많은 관계의 시작점입니다. 순결 벨트 (가랑이 로프)와 등자 힐 타이. (여기서는 "종달새의 머리 단일 열"을 "LHCS"로 약칭하기도 합니다.)
역방향 텐션 단일 열은 다음과 같은 순방향 텐션 스타일보다 속도가 느립니다. 서머빌 보우라인 꼬리를 당겨야 하기 때문에 (매듭을 묶는 동안 로프의 전체 길이를 매듭의 일부분을 통해 당겨야 하며, 이 경우 2~3회) 이 매듭은 부피가 적고 어떤 사람들은 더 매력적이라고 생각합니다. 꼬리를 풀지 않고는 풀 수 없습니다 (이것은 상황에 따라 좋은 일이거나 나쁜 일이 될 수 있습니다).
중요한 안전 팁! 손목은 민감하므로 조심스럽게 다루어야 합니다.
- 손목 안쪽 피부 근처에는 많은 신경과 혈관이 있습니다. 이곳에 너무 많은 압력이 가해지면 혈류나 신경 전도에 영향을 미칠 수 있습니다. 팔목은 너무 꽉 조이지 않아야 하며, 항상 두 손가락을 팔목 아래에 넣을 수 있어야 합니다.
- 손목 관절 자체도 연약합니다. 손목을 너무 세게 당기면 관절이 손상되거나 작은 손목 뼈가 잘못된 위치로 밀려날 수도 있습니다. 절대로 손목만 잡고 매달지 마세요. 손목에 지속적으로 강한 압력이 가해지는 자세로 사람을 묶어두지 마세요.
- 예를 들어 파트너의 손목을 침대 기둥에 묶은 다음 발을 잡고 침대 발 쪽으로 급격하게 잡아당기는 경우가 이에 해당할 수 있습니다. 이 경우 손목 관절에 너무 많은 압력이 가해질 수 있습니다. 파트너를 침대에 묶는 것은 매우 재미있을 수 있지만, 파트너가 팔과 손목을 충분히 움직일 수 있도록 타이에 충분한 여유가 있는지 확인하여 수시로 커프와 로프 가닥의 위치를 조정하세요.

이 튜토리얼에서는 10'(~3m) 길이의 천연 1/4"(6mm) 대마 한 장을 사용했습니다.
이 사이트의 대부분의 넥타이에는 놀라운 천연 대마 제휴사에서 제공한 로프 Twisted Monk. 확인해 보세요!

동영상 콘텐츠:
- 커프 만들기 (0:44)
- 커프 잠금, 포워드 텐션 스타일 (4:04)
- 커프 잠금, 리버스 텐션 스타일 (6:16)
Hi, its very clear. Apart aesthetism, does this single colum often use compare to the somervile one ?
Thank you
This question is answered in the tutorial above, in the paragraph that begins “Reverse-tension Single Columns are slower…” If you have further questions beyond that, let me know!
The triangle is such a clean look! I finally got this one after a handful of tries, and it’s kind of great. Thanks!
Hello I have a question about locking bandswrapscuffs off. I notice in the older version here that you lock off by pulling the tail UNDER the cuff then leading it back over the cuff and through the loop. This seems to be the same general idea as in your Locking off a Strap video on the Half-Hitch tutorial page both for the reverse and forward tension examples as well as in the Bondage Belt w Happy Strap and Unchastity Belt tutorials. In the newer version here though for both the forward and reverse tension versions you start by bringing the tail OVER the cuff then leading it back under the cuff and through the loop. The Prusik Single Column tutorial seems to have this same general idea too. What Im wondering is if there is a significant difference between the under cuff first and over cuff first approaches to locking off. I want to make sure Im not missing something important especially if there are safety considerations
Assuming you make sure that all the strands in the cuff have the same tension and are not too tight, there is no real safety difference*, these are all just half hitches locking off the strap.
* One could argue that reversing tension one last time before locking off with a half hitch has a marginal safety edge in that it adds more friction, but it also adds significantly more bulk, which represents a risk too if it tension is added to the tail in such a way that the bulky knot is pressed into the skin in a sensitive area. So I prefer the less bulky version for tails running parallel to the column and I use the Somerville Bowline when the tail is going to run perpendicular to the column.
As a more experienced person and me just learning how would you determine which knot to use. What would determine that I want to use the forward over the reverse. I just needed so clarification.
I need to put together a post on this! Generally, Reverse SCs are good for greater security. They cannot be untied without releasing the tail. They also have a certain look that some prefer. Forward SC, can be tied or untied without releasing the tail. This can be a great safety feature. When “slipped” (as in a Slipped Somerville Bowline), it can allow for a quick release. Check out the Malasana tie for an example.
Is there a way to add additional wraps to this?
Yes. Most riggers tend to stop at 2 wraps (4 cords) or 3 wrap (6 cords) because beyond that the cords tend to start bunching up when you lock them off with the half hitch. That said, I have seen people do many wraps and just account for the bunching by adding a little more slack.
Followup question!
If I were to try a third wrap, would I have to pass the tail through the beginning of the wrapping (so only under two ropes, the ones close to the lark’s head), or should I pass it under both of the other wraps (so under 4 ropes)?
Man, this is complicated to put into words… I’m not sure I explained myself.
I’m still going to try this on myself, but I wanted to get an expert opinion first.
No worries. In Step 5 (after reversing tension), wrap twice instead of once as shown. Then continue on with the rest of steps at shown. In Steps 9-10, go under all 6 strands instead of the shown 4.
I am planning an update of this tutorial sometime in the next few months. I will add this variant to the new version!
Hello! I am new to all this, but just wanted to say I find your site awesome and really helpfull, cheers! 🙂
Hello! I was curious about a part of this tie, after step 8. I notice that the tension is not reversed before locking off the tie with a half hitch. I was previously taught to always reverse the tension before locking it off, so I was curious about the potential advantage/disadvantage of doing so.
Good Question! Both work fine. The advantage of doing it this way is mostly aesthetic (I think it looks nicer) but it is also a bit less bulky. The advantage of adding the reverse before doing you half-hitch is that it is a little easier to set and maintain your tension while locking off the cuff. I personally find that the difference is minimal though. But you raise a good point! I will update the tutorial itself with this comment.
[...] 단일 컬럼 타이(단계별 사진 튜토리얼) [...]
[...] 이건 제대로 된 매듭입니다!... [...]
This is a proper knot!