

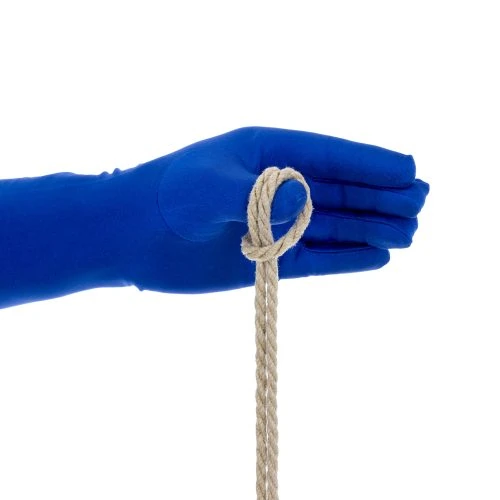
Diese beliebte einspaltige Krawatte mit umgekehrter Spannung ist attraktiv, liegt relativ flach und ist sehr sicher.
Einspaltige Krawatten bilden eine nicht zusammenfallende Manschette, einen Gürtel, ein Band oder ein Band um jede eine Sache.
- Handgelenk
- Knöchel
- Oberschenkel
- Knie
- Taille
- Brustkorb
Dies ist der Ausgangspunkt für viele Krawatten, wie die Unkeuschheitsgürtel (Crotch Rope) und das Steigbügel-Fersenband. (Hier auf TheDuchy kürzen wir "Lark's Head Single Column" manchmal mit "LHCS" ab).
Einzelne Säulen mit umgekehrter Spannung sind langsamer als solche mit Vorwärtsspannung wie die Somerville-Palstek da sie Schwanzzüge erfordern (die gesamte Länge des Seils muss während des Bindens durch einen Teil des Knotens gezogen werden, in diesem Fall 2-3 Mal) Abgesehen davon ist dieser Knoten auch weniger sperrig und manche finden ihn attraktiver. Sie kann nicht gelöst werden, ohne die Rute zu befreien (das kann je nach Situation gut oder schlecht sein).
Wichtiger Sicherheitstipp! Handgelenke sind empfindlich, sie müssen mit Vorsicht behandelt werden.
- An der Innenseite der Handgelenke befinden sich viele Nerven und Blutgefäße in der Nähe der Haut. Zu viel Druck kann dort den Blutfluss oder die Nervenleitung beeinträchtigen. Die Manschetten sollten nie zu eng sein; Sie sollten immer zwei Finger unter eine Manschette schieben können.
- Auch das Handgelenk selbst ist empfindlich. Wenn Sie zu stark am Handgelenk ziehen, können Sie das Gelenk beschädigen oder sogar einige der kleinen Handgelenksknochen in die falsche Position drücken. Hängen Sie eine Person NIEMALS nur an den Handgelenken auf. Fesseln Sie eine Person nie in einer Position, in der das Seil eine starke, kontinuierliche Belastung auf die Handgelenke ausübt.
- Ein Beispiel hierfür wäre, wenn Sie die Handgelenke Ihres Partners an den Bettpfosten fesseln, dann seine Füße packen und sie kräftig zum Fußende des Bettes ziehen. In diesem Fall kann es passieren, dass Sie zu viel Druck auf die Handgelenke ausüben. Das Fesseln Ihres Partners an ein Bett kann ein Riesenspaß sein, aber achten Sie darauf, dass die Fesseln so locker sind, dass Ihr Partner seine Arme und Handgelenke ausreichend bewegen kann, um die Lage der Manschette und der Seilstränge von Zeit zu Zeit anzupassen.

Für diese Anleitung habe ich ein 10′ (~3m) langes Stück Natural 1/4″ (6mm) Hanf verwendet.
Für die meisten Krawatten auf dieser Website verwende ich eine erstaunliche Natürlicher Hanf Seil zur Verfügung gestellt von meiner Partnerfirma Twisted Monk. Probieren Sie es aus!

Video-Inhalte:
- Erstellen der Manschette (0:44)
- Verschließen der Manschette, Vorwärtsspannung (4:04)
- Verschließen der Manschette mit umgekehrter Spannung (6:16)
Hi, its very clear. Apart aesthetism, does this single colum often use compare to the somervile one ?
Thank you
This question is answered in the tutorial above, in the paragraph that begins “Reverse-tension Single Columns are slower…” If you have further questions beyond that, let me know!
The triangle is such a clean look! I finally got this one after a handful of tries, and it’s kind of great. Thanks!
Hello I have a question about locking bandswrapscuffs off. I notice in the older version here that you lock off by pulling the tail UNDER the cuff then leading it back over the cuff and through the loop. This seems to be the same general idea as in your Locking off a Strap video on the Half-Hitch tutorial page both for the reverse and forward tension examples as well as in the Bondage Belt w Happy Strap and Unchastity Belt tutorials. In the newer version here though for both the forward and reverse tension versions you start by bringing the tail OVER the cuff then leading it back under the cuff and through the loop. The Prusik Single Column tutorial seems to have this same general idea too. What Im wondering is if there is a significant difference between the under cuff first and over cuff first approaches to locking off. I want to make sure Im not missing something important especially if there are safety considerations
Assuming you make sure that all the strands in the cuff have the same tension and are not too tight, there is no real safety difference*, these are all just half hitches locking off the strap.
* One could argue that reversing tension one last time before locking off with a half hitch has a marginal safety edge in that it adds more friction, but it also adds significantly more bulk, which represents a risk too if it tension is added to the tail in such a way that the bulky knot is pressed into the skin in a sensitive area. So I prefer the less bulky version for tails running parallel to the column and I use the Somerville Bowline when the tail is going to run perpendicular to the column.
As a more experienced person and me just learning how would you determine which knot to use. What would determine that I want to use the forward over the reverse. I just needed so clarification.
I need to put together a post on this! Generally, Reverse SCs are good for greater security. They cannot be untied without releasing the tail. They also have a certain look that some prefer. Forward SC, can be tied or untied without releasing the tail. This can be a great safety feature. When “slipped” (as in a Slipped Somerville Bowline), it can allow for a quick release. Check out the Malasana tie for an example.
Is there a way to add additional wraps to this?
Yes. Most riggers tend to stop at 2 wraps (4 cords) or 3 wrap (6 cords) because beyond that the cords tend to start bunching up when you lock them off with the half hitch. That said, I have seen people do many wraps and just account for the bunching by adding a little more slack.
Followup question!
If I were to try a third wrap, would I have to pass the tail through the beginning of the wrapping (so only under two ropes, the ones close to the lark’s head), or should I pass it under both of the other wraps (so under 4 ropes)?
Man, this is complicated to put into words… I’m not sure I explained myself.
I’m still going to try this on myself, but I wanted to get an expert opinion first.
No worries. In Step 5 (after reversing tension), wrap twice instead of once as shown. Then continue on with the rest of steps at shown. In Steps 9-10, go under all 6 strands instead of the shown 4.
I am planning an update of this tutorial sometime in the next few months. I will add this variant to the new version!
Hello! I am new to all this, but just wanted to say I find your site awesome and really helpfull, cheers! 🙂
Hello! I was curious about a part of this tie, after step 8. I notice that the tension is not reversed before locking off the tie with a half hitch. I was previously taught to always reverse the tension before locking it off, so I was curious about the potential advantage/disadvantage of doing so.
Good Question! Both work fine. The advantage of doing it this way is mostly aesthetic (I think it looks nicer) but it is also a bit less bulky. The advantage of adding the reverse before doing you half-hitch is that it is a little easier to set and maintain your tension while locking off the cuff. I personally find that the difference is minimal though. But you raise a good point! I will update the tutorial itself with this comment.
[...] eine einspaltige Krawatte (eine Schritt-für-Schritt-Fotoanleitung) [...]
[...] Das ist ein richtiger Knoten! [...]
This is a proper knot!